3 Expert Hacks To Fix Noisy Gears!
With a little practice, changing bike gears can be as intuitive as pedalling. Here’s what you need to know.

Shifting gears is a lot like skiing: it’s easy to learn, but difficult to master. If you’re new to cycling, the concept of shifting gears can be crazy confusing. If you’re an old pro, it’s an intuitive part of the sport that’s as simple as it is necessary.
But no matter where you fall on the shifting spectrum, paying closer attention to this underrated skill can result in improvements as simple as a more effortless spin, or something as monumental as a race-winning move.
The Easiest Way to Improve: Know When to Shift
Aside from learning how to shift, understanding when to shift is most important. Shift to an easier gear on hills or when you’re riding into the wind. Use a harder gear on flats or if the wind is blowing from behind (a tailwind). When in doubt, shift before the terrain changes, especially when approaching hills. Don’t wait until you feel the incline kick in before you shift to an easier gear. When you do shift, keep pedalling, but ease up slightly on the pedals – if you’re pushing too hard, or if you stop pedalling completely, the chain may skip or fall off.
RELATED: 6 Gearing Mistakes You’re Probably Making
When you’re just getting comfortable on a bike, practise shifting using the small or middle chainring in the front, and the middle rear cogs in the back. If you’re not sure what gear you’re in, look down to the crank and cassette to check. When doing so, look out for cross-chaining, which happens when the chain is at an extreme slant – either in the big ring up front and the biggest cog at the back, or in the small ring up front and the smallest cog at the back. On some bikes, you’ll hear a clicking noise when you’re cross-chaining.

The Intermediate Investment: Clean and Check Your Chain
Few tools can replace regular proper maintenance on your bike, but there are some affordable essentials that can help you care for and extend the life of your equipment.
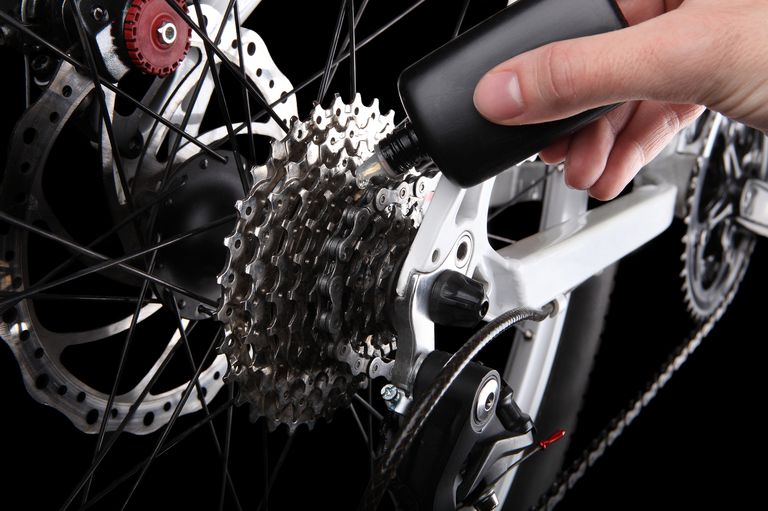
While there are several schools of thought on the best way to clean a bike, it’s hard to argue against the effectiveness of warm soapy water and cleaning brushes. Hose your bike down, scrub the cassette and chain with a soapy brush, and rinse. Once your bike is dry, and you’ve lubed the chain, it’s time to see if there’s still life in it, using a chain checker.
A chain checker, in its simplest form, is a tool that can be linked atop your chain to measure the percentage of wear. Depending on the number of gears your bike has, companies recommend replacing a chain after it has reached 0.5 or 0.75 per cent wear. Hook the curved end of the tool into the chain. When the end marked 0.75 fits into the rollers without being forced, it’s time to change your chain. This allows you to get maximum life out of the chain, without wearing down the other expensive parts of your bike.
The Expert-Level Hack: Adjust Your Rear
You should take your bike to a trusted mechanic for a full tune-up when you can; but sometimes that’s not possible, and at others it’s not necessary. Regularly maintaining your own drivetrain and derailleurs will help you avoid bigger, more costly issues in the future.
RELATED: Nine Ways You’re Destroying Your Cycling Gear
First, you should observe if the derailleur hanger is aligned with the cassette, meaning the upper jockey wheel is directly below the cog that the chain wraps around. If it is, your shifting problems are due to cable tension, which can be resolved with the barrel adjuster or by adjusting cable tension at the cable anchor.
If it’s not, shift your chain to the smallest cog, remove the cable from the cable anchor with a 5mm hex key, and adjust the high-limit screw with a screwdriver until the upper jockey wheel is directly below that cog. Here, the derailleur will move in the opposite direction to which you turn the screw. Then, move the chain to the biggest cog and adjust the lower-limit screw with a screwdriver until the upper jockey wheel is below that cog. Here, the derailleur will move in the same direction that you turn the screw.
Once that’s complete, reattach the cable to the cable anchor by pulling the cable with your fingers and tightening it onto the rear derailleur. Now tuning can now be done by tightening (counterclockwise) or loosening (clockwise) the cable with the barrel adjuster. Master this, and your bike will roll smoothly every ride.
What to Do If You Drop Your Chain
A dropped chain typically happens when shifting between the big and small ring in the front, or when shifting under too much pressure. If your chain slides off the chainring, the first thing to do is to slowly and safely pull over and step off your bike.
Push the rear jockey wheels (the mini wheels that hang below the cogset) towards the front wheel to give yourself some slack. Then grab your chain and manually guide it back onto the chainring. Lift your rear wheel off the ground and turn the pedals over a few times with your hand to make sure it’s running smoothly.
Fair warning: your hands will get covered in grease when you touch the chain, so you may want to keep a pair of medical gloves or a packet of hand wipes in your saddle bag for such disasters. If your chain starts to drop every ride, your bike’s derailleurs may need to be tuned.
You Should Know
Advancements in drivetrain technology have resulted in highly effective electronic and wireless shifting.
While these are costly upgrades, they can be great for cyclists interested in low-maintenance options. Cyclists in search of less maintenance may also be interested in 1x cranksets that offer the same gear ratio as other set-ups, with bigger jumps between each gear.
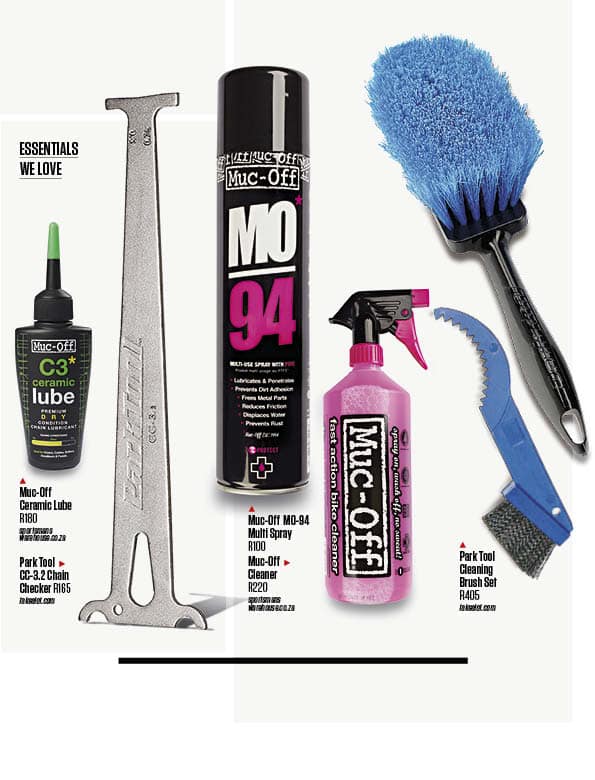
ESSENTIALS WE LOVE
READ MORE ON: bikes gear gears noisy gears