How to Spec, Install, and Troubleshoot a Dropper Post
A dropper post will transform your off-road riding, allowing you to navigate steeper, scarier descents with confidence and grace.
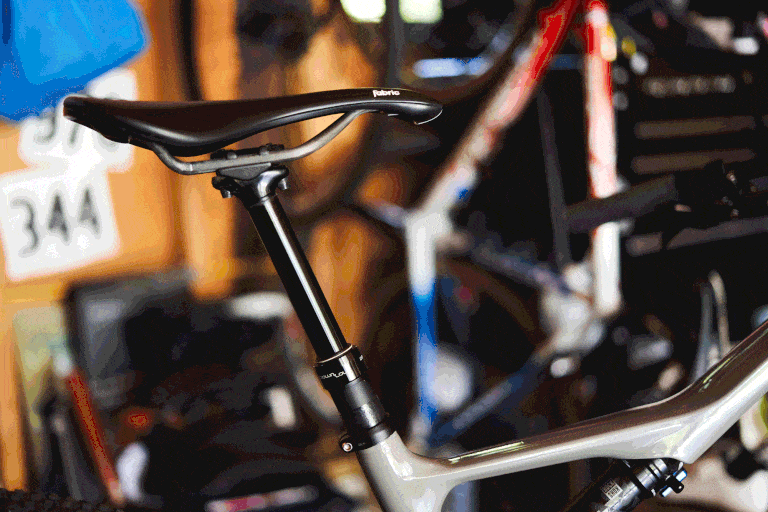
A dropper post is an incredibly useful and often skill-boosting tool commonly found on mountain bikes, and now increasingly gravel bikes. This component is basically a seat post that allows you to adjust its height as you’re riding by activating a remote lever on your handlebar.
Many mountain bikes already come with a dropper post nowadays, but not all. So if you’re in the market for one, here’s how to install a dropper post—plus tips for picking the right size and troubleshooting problems.
Routing Type
First, you’ll want to determine which type of cable routing will work on your bike: internal or external. Check to see if your bike has any suitable—and unused—cable ports for running a dropper post cable internally through your frame; in this case, the cable will attach to the bottom of the dropper post. You’ll typically find a cable port to the side of the head tube or towards the bottom of the seat tube. If there aren’t any, which is common on older bikes, you’ll need a dropper post with external cable routing, where the cable runs from the top or collar of the dropper post.
Size It
Dropper posts come in a variety of sizes, and finding one that’s the right size for you and your bike is sometimes half the battle. Prior to purchasing one, you should familiarise yourself with the following key measurements.
Seat Tube Diameter
The first measurement you’ll need to determine is the diameter of your seat tube. There are several standard sizes for bikes: 27.2mm, 30.9mm, 31.6mm, and 34.9mm. Most dropper posts are not offered in all four of those diameters, and the middle two are currently the most common.
Maximum Insertion Depth
How much of the dropper (or any seat post) you can insert into the seat tube of your specific bike. This depends on the size and design of your bike frame. Some bike companies will provide this measurement for you. If not, you can measure it yourself using your current seat post. But you’ll also need to take into consideration the length of the dropper post actuator which sticks out at the bottom.
Minimum Insertion
This is how much of the dropper post you need to install within the seat tube, for safety purposes. You’ll focus on finding a dropper post that will fit your specific seat height when fully extended, while taking into account the minimum insertion requirement of the dropper post, plus the maximum insertion depth for your seat tube.

Travel
Travel is the amount that the dropper post can lower or “drop” when activated. The travel on most dropper posts falls within the range of 60mm to 180mm. Any travel is better than none, but you may choose to optimise the amount of travel. More travel will allow you to lower the seat even further. The lower your seat can go, the lower your centre of gravity can go and the easier it is to sit back on the bike; this is important when riding down steep, technical trails.
Stack Height
Stack height is the length of the dropper post from the collar to the saddle rails. This is an important measurement to consider because this affects the lowest possible seat height for that dropper post with it fully extended. Stack height can vary across dropper posts even if they’re the same travel.
Lever Styles
The amount of available room on the left side of your handlebar will determine which style of lever you can use. (Not all dropper posts are sold with the lever included, either.) There are two common styles for mountain bike handlebars: a smaller, vertical lever for 2x and 3x drivetrains, and a larger, horizontal lever (much like a shifter lever) for a 1x drivetrain.
If your bike has a front derailleur, and more than one chainring up front, you’ll likely need the vertical style in order to fit it onto your handlebar alongside your front shifter. There are also levers designed specifically for bikes with a drop bar, such as an integrated brake lever, bar-end lever, and more.
How to Install a Dropper Post
Internal Routing
If you have available cable ports and are routing your dropper post internally, you’ll either thread the cable up through the seat tube, or through the down tube first at the front of the bike and then up the seat tube. For the latter, you may need to remove the fork and/or crank and bottom bracket in order to route the cable—it can be tricky to get the cable past the bottom bracket and up the seat tube.

Route the cable housing through the frame, leaving a little excess past the opening of the seat tube. At the handlebar end, measure out the length of housing needed to fit it to the lever and trim it with cable cutters. You’ll want enough cable housing off the front to allow the handlebar to move freely from side to side. It’s better to have some excess housing off the front than to cut it too short and wind up needing a new one.

“With cable-actuated droppers, one thing that can really cause a headache is housing length and routing,” says Bicycling senior test editor Matt Phillips. “Running the housing a touch long is a good idea, and make sure the housing is routed as cleanly as possible—no sharp bends.”
Next, take the cable and run it through the lever, barrel adjuster, and housing. Depending on your lever type (like with some 1x levers), you may pull the cable taut through the lever here or leave excess to secure within the lever later.

Thread the end cap onto the cable and fit it securely on the housing by the seat tube. Check the manufacturer’s instructions to see how much excess cable you’ll need between the end cap and the cable clamp in order to fit it onto the dropper post actuator. Tightly secure the cable clamp in the required spot, measuring the exposed cable between it and the end cap to ensure it’s the correct length. Trim off the excess cable at the end.

Take the dropper post in hand and fit the cable clamp into place. Apply a thin layer of friction paste (like Park Tool’s Supergrip Compound) to the dropper post, focusing on the area that will sit inside the seat tube. Set the dropper post into the seat tube, while removing slack from the cable and housing by pulling it out of the cable port at the other end. Secure the post in place at the correct seat height.

Position the lever so your thumb can easily activate it. (If you’re using a 2x or 3x style lever, you’ll now fit and secure the cable within the lever, place an end cap over the tip of the cable, and tuck it into place.) Finally, take any slack out of the cable with the lever’s barrel adjuster; you’ll want to adjust it enough so that the lever smoothly and quickly activates the dropper post, but not so much that it triggers it on its own.
External Routing
For external routing, first install your new dropper post at your correct seat height; apply a thin layer of friction paste to the area that will sit inside the seat tube. Install the lever onto the handlebar within reach of where your thumb will activate it. Run the cable housing along the top tube at the appropriate length from the post to the lever, again leaving room off the front for your handlebar to turn freely, and secure it to the top tube with zip ties (or velcro straps).
Fit the end cap securely onto the housing by the dropper post. Thread the cable through that end and out the other side. Remove the actuator cover on the dropper post and fit the cable end into the recessed area, then put the cover back on. Pull the cable so that it sits taut within the actuator with the housing fitted into the end.
Thread the other end of the cable through the barrel adjuster and lever, and secure it within the lever. Trim the cable, fit an end cap on and clamp it down into place, and tuck it behind the lever. Use the barrel adjuster to remove any slack from the cable.

Tips and Troubleshooting
Dropper posts can seem temperamental at times—like when you’re two-thirds of the way through your ride and now it decides to no longer stay up. If that’s the case, first check to make sure you’ve installed it correctly. Bicycling test manager Dan Roe says to not overtighten the seat post clamp, as this can cause the dropper post to malfunction. Again, make sure you’ve used friction paste when installing it, says Phillips, so you can use a lower torque on the seat post clamp. Another common reason a cable-actuated dropper post might malfunction is from installing it either too high or too low in the seat tube, which can interfere with the cable.
Of course, dropper posts can malfunction even when installed correctly, especially with use over time. Or, it might start sliding less efficiently than it used to. Like most other bike parts, dropper posts do need to be serviced after a period of time. Check the manufacturer’s instructions to see when that is.
“Consider a dropper post a suspension component,” Phillips says. “Like your fork and shock, they need routine service to perform at their best.”
Lastly, there are some important things you should avoid doing, according to Phillips: Don’t pull up on or hang the bike from the seat when the dropper post is compressed, and don’t attach or clamp anything to the inner post since that could damage the surface.
READ MORE ON: DIY dropper post fit it yourself workshop ]home mechanics