The Perfect Bike Fit
How to find the right frame and make adjustments for endless comfort.
How to find the right frame and make adjustments for endless comfort. – By Joe Lindsey
While there is no universal method for fitting a bicycle to the rider, fit theories do agree on most things, and proper training and equipment help bike-shop workers and fitters do their job consistently well. You’ll have an easier time shopping if you know a few benchmark measurements.
Start with figuring your frame size and seat height, and then, when you have the bike, determine your proper cleat placement, saddle position and handlebar reach, in that order. These are just a guide, it is advised to get a proper bike-fit done by a professional.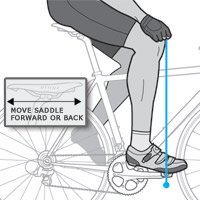
Reach to Handlebar
This is the most variable of all measurements, as it depends greatly on your flexibility. You want a slight angle at the elbow when your hands are on the hoods or drops, but you shouldn’t force yourself to bend double to get it. On a new bike, ask the shop to leave the steerer tube long and add 2 inches of spacers under the stem. Move the spacers above or below the stem to fine-tune your fit, and have the shop cut the steerer later, if needed.
Frame Size
In socks, place a thin hardcover book, spine up, between your legs with about the same upward pressure a saddle produces. Measure your inseam, from the book’s spine to the floor, in centimeters. Multiply that number by 0.65; the result is your approximate road frame size. For example, 81cm x 0.65 = 52.65-a 52 or 53cm frame (sizes are the seat-tube length). Note that compact sizing uses a virtual seat-tube length, so don’t go by the stated size unless it has the same virtual size. To convert to inch sizing, divide by 2.54. For mountain bikes, subtract 10-12cm from your road size.
Saddle Position
The front of your forward knee should be directly over the ball of your foot when the pedal is at the 3 o’clock position. Check this with a plumb line. If the line doesn’t pass the front of the pedal axle, move your seat forward or back on the rails until it does. Your seat should be level, or point at most a couple of degrees up or down. Check it with a carpenter’s level.
Seat Height
Your knee should have a slight bend in it at the bottom of your pedal stroke. (The bottom is when the crankarm is parallel to the seat tube, not perpendicular to the ground.) To check this, in cycling shoes, pedal unclipped with your heels on the pedals. You should barely maintain contact with the pedal at the bottom of the stroke, without rocking your pelvis. Measure the distance between the bottom bracket and the top of the seat. This is your seat height. It should be very close to the product of your inseam (in centimeters) multiplied by 0.883.
Cleat Placement
Mount your cleats on your shoes so that the ball of your foot is directly over the pedal spindle for maximum power transfer. Unless you have an unusual stride or stance (splayfoot, etc.), point the tips of the cleats at the tips of the shoes for a neutral pedaling stance to start out. Pay attention to your pedaling style on the first couple of rides and adjust as needed-this is one place where professional fit advice may be worth the cost to help avoid injury.
READ MORE ON: bike advice fit