Tubeless Tyres Are Life-Changing – Here’s How To Make The Switch!
Changing flats all the time is a real drag, so here’s the full rundown on what tubeless are, how they work, and how to work with them.
If it ain’t broke, don’t fix it, right? Well, that seemed to ring true for the pneumatic bicycle tyre. Since John Boyd Dunlop invented it back in 1887, bike tyres remained fairly unchanged for decades: an inner, inflatable tube that offers flotation for a smooth ride and efficiency for a fast one encased in an outer layer of grippy rubber that provides traction and protection against flats.
That was until 1999, when Mavic created the first tubeless tyre system for bikes. Tubeless was first heavily adopted amongst mountain bikers, but this innovation has since expanded to cyclocross, gravel, and even traditional road bike segments.
Along the way, tubeless tyres have gotten lighter, more reliable, and now offer an improved ride experience compared to earlier versions. “Honestly, I don’t see any drawbacks to [tubeless],” says Tom Hopper, a longtime pro mechanic for cyclocross and the EF Education First WorldTour team (which, full disclosure, still races with traditional tubular tyres). If you haven’t yet made the transition to tubeless yourself, here’s what you need to know about this life-changing technology.
What Are Tubeless Tyres?
In order to understand how tubeless tyres work, here’s a quick refresher on the three main types of bicycle tyres: conventional clincher, tubular, and tubeless clincher.
Clincher
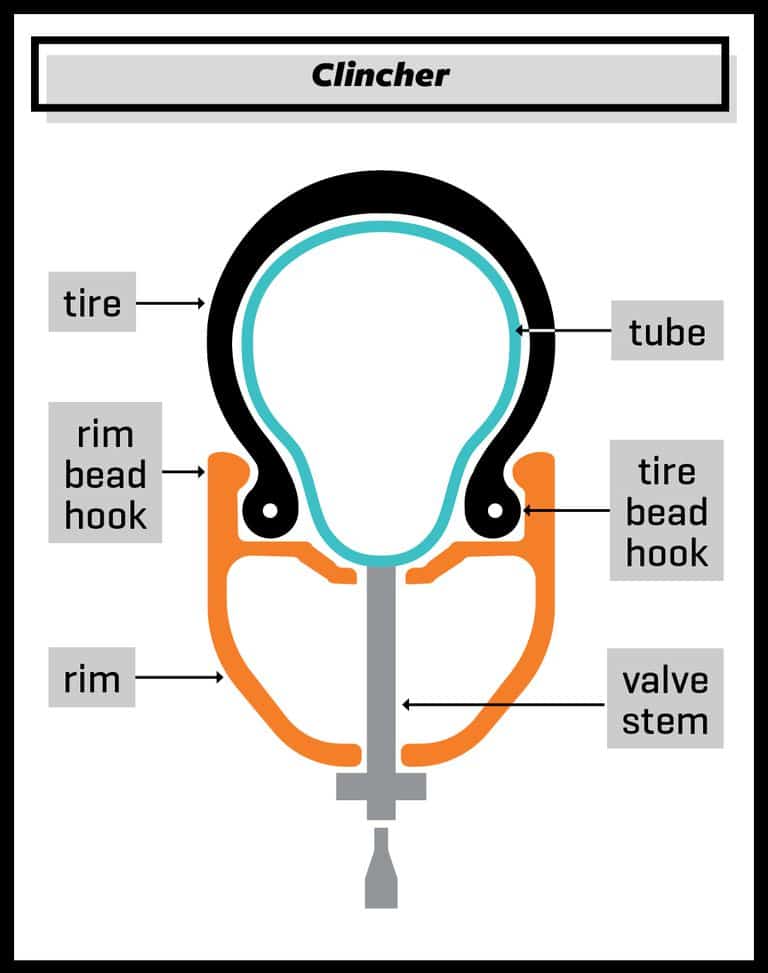
Conventional clinchers are the most common type of tyre sold on bikes. As the inner tube inflates, it presses the rim and tyre beads together, which secures the tyre to the rim. A clincher tyre is held on primarily with air pressure, and while they are easy to install and fix when you get a flat, they’re a little heavier, and tubes are susceptible to pinch flats.
Tubular
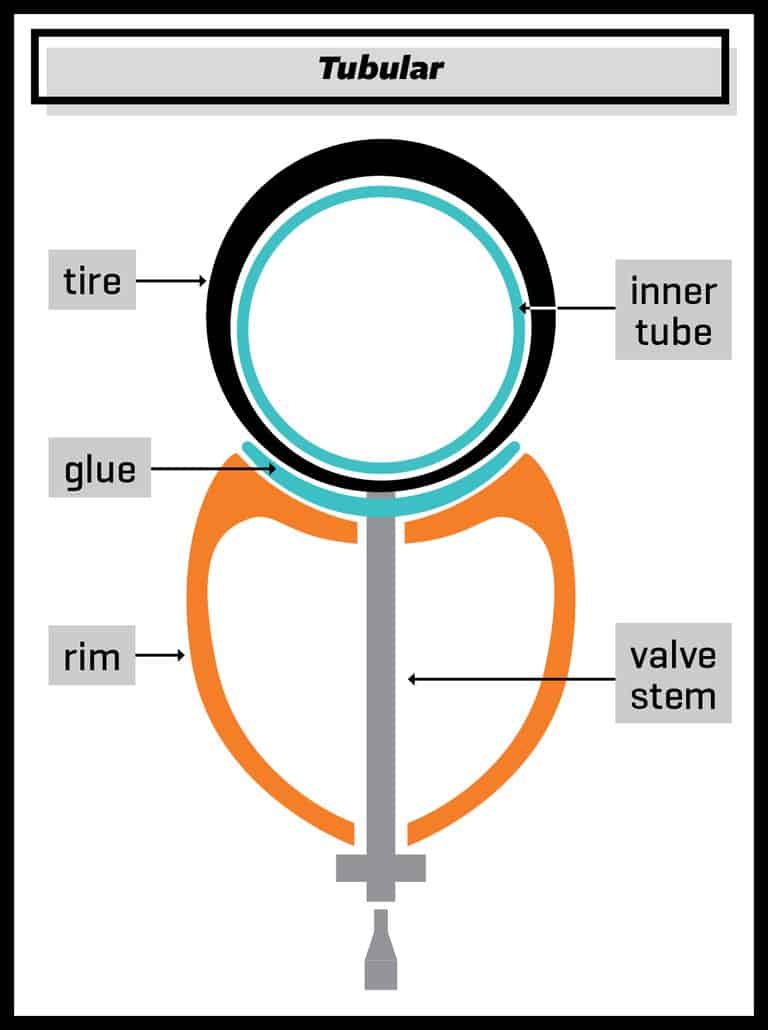
Tubulars have an inner tube that is completely enclosed by the tyre casing, which is stitched together at the base. The tyre is glued to the rim. The benefit to tubulars is a highly-refined ride quality and, broadly speaking, the lowest weight and rolling resistance. The downsides are flats (with no easy fix) and tricky installation.
Tubeless Clincher
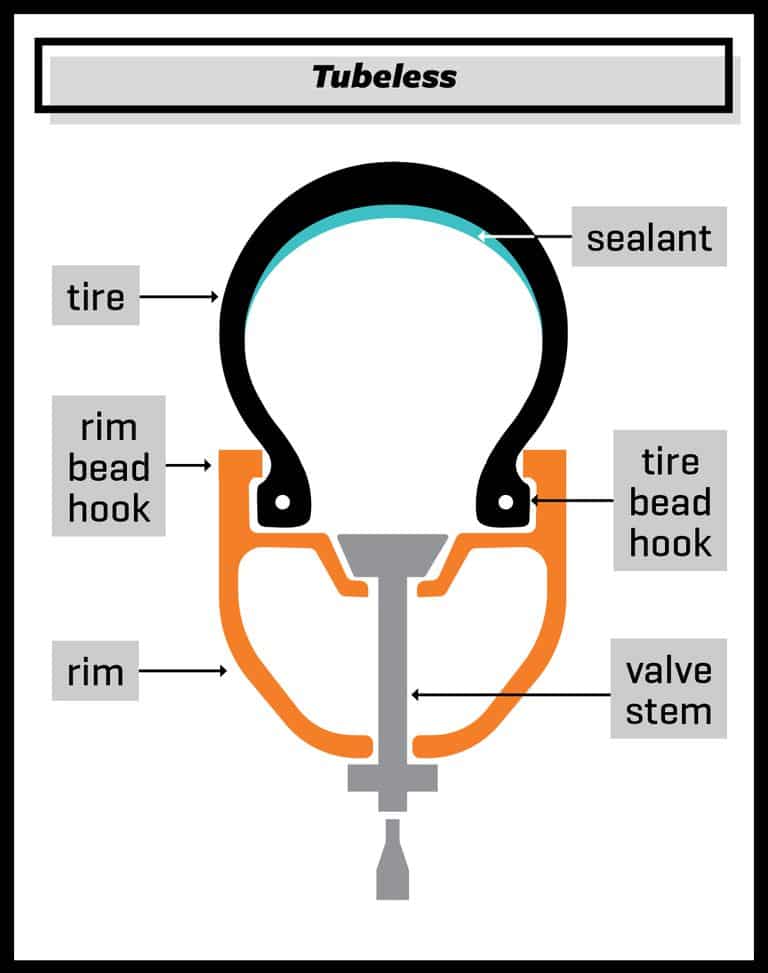
Tubeless tyres feature the same general cross-section as a conventional clincher, but without an inner tube. Instead, a layer in the tyre casing or liquid sealant is used to make the tyre impermeable to air. The rim and tyre beads have a different shape than conventional clinchers, with interlocking profiles that form a seal under pressure – much like how a sandwich bag closure works.
The rim bead isn’t the only difference in the wheels themselves. Because tubeless tyres hold air, the rim bed needs to be sealed completely. Tubeless tyres also offer the ability to run lower air pressure for a better grip and more comfortable ride, are much more resistant to flats, and the tyre is less likely to separate from the rim if you do flat. But that all comes at a cost: Tubeless systems can be the heaviest of the three (especially for mountain biking). They can also be somewhat difficult to set up initially, and while flats are far less likely, if you do get one, field repairs tend to be messy and take longer than conventional clinchers.
Tubeless Ready or Tubeless Compatible?
Today, tubeless is the dominant style of wheel and tyre for mountain biking. But the attributes that make it desirable also hold for gravel and cyclocross riding, and tubeless has even made inroads in performance road systems. When considering running tubeless yourself, you’ll hear three common terms used: tubeless ready, tubeless compatible, and UST.
Tubeless Ready: The dominant technology in the bike industry today, tubeless-ready rims and tyres have bead locks, but the actual profiles of the rim cross-sections and tyre bead locks vary from brand to brand. To be “tubeless ready,” rims on complete wheelsets have spoke beds sealed with tape. Tubeless ready tyres don’t have the sealed casing that UST tyres (see below) do. That makes them lighter, and also means they require sealant to hold air.
Tubeless Compatible: A tubeless-compatible wheel or rim is one in which the rim has a bead lock, but the rim bed itself is not sealed. Some companies use “tubeless ready” and “tubeless compatible” as synonyms. In either case, the components needed to run the wheel and tyre combo as a tubeless setup are the same: a sealed rim bed, tyre with a tubeless bead lock, and sealant.
UST: An acronym that stands for Universal System Tubeless, a patented Mavic standard developed in 1999 in partnership with Hutchinson and Michelin. UST is an engineering standard, with a matching square-shaped bead lock for the rim and tyre, and a tyre with an impermeable butyl rubber layer so that it can be inflated and hold air without sealant. Several companies make UST-compatible tyres, but Mavic is the only company making UST rims and wheels. UST tyres are heavy, and the UST standard has not been updated for modern wide mountain bike rims, so it’s a small part of the overall market today.
It’s important to note that, other than UST, these are generic terms, not engineering standards. With tubeless-ready and tubeless-compatible systems, actual compatibility between tyres and rims varies across brands. Check manufacturer specifications for recommendations, and never attempt to set up a non-tubeless tyre or rim as tubeless. Without the bead lock, you risk unpredictable blowouts from beads separating from the rim even at normal tyre pressures.
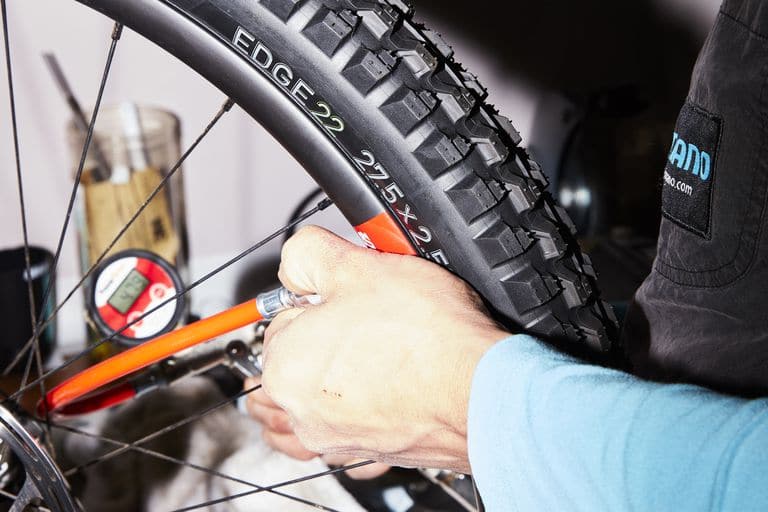
Tubeless Tyre Installation Tips
We won’t sugarcoat it: Setting up tubeless tyres for the first time can be a frustrating experience. Mike Curiak, a longtime adventure rider and photographer who’s built thousands of tubeless wheelsets through his Lace Mine 29 wheelbuilding shop, has a tried-and-true approach: He uses a tube at first, inflates to normal pressure, and then sets the wheel out in the warm sun for an hour or so.
“This does three things at once,” he explains. “It gets the tape stuck down uniformly to the rim, it pushes all the air bubbles out of the tape, and it seats at least one bead of the tyre.” Also, if you’re using new tyres, it also helps the tyre bead soften the kink that results from the tyre being stored folded for long periods, which can prevent it from seating.
Bring the wheel in and let cool to room temperature (so the rim tape adhesive isn’t gooey). Then, pop one bead off, remove the tube, install the valve stem and replace the bead. Add the recommended amount of sealant through the stem, replace the valve core, and inflate. Curiak says he uses a simple floor pump, or Hopper says he’s found some tyre/rim combos simply do need the blast from an air compressor or a comparable floor pump like the Bontrager TLR Flashcharger Floor Pump.
Other tricks to seat the bead include using a long, tie-down strap (or even a spare deflated tube) cinched down around the circumference of the tyre to help push the bead out toward the rim, and bouncing the wheel gently when inflating. A light application of soapy water to the tyre/rim bead seat with a clean rag or sponge can also help the tyre bead slip on more smoothly.
Tubeless Field Repair Tips
Sealant automatically repairs most small punctures; your only clue may be a small bit of blueish white sealant on the tread. If you get a particularly big gash, you have three likely fixes: plugs, a patch, or a tube. It’s best to carry all three. If your sealant is relatively fresh, Curiak says one or two tyre plugs usually do the trick for most medium-size punctures. We like DynaPlug Racer, which keeps you rolling with a super quick repair.
For large cuts like a sidewall tear, all kinds of patch materials will do: Duct tape is Hopper’s go-to, but Curiak has used pieces of leather or neoprene from old gloves. “It doesn’t have to be sold as a repair material to do the job,” he says. Patches can be a more or less permanent fix, but inspect your sidewalls after every ride for signs that the casing is failing. If the cut is fairly smooth, smear Gear Aid AquaSeal UV on top to help keep the edges together.
If a patch won’t work, install a tube, but Curiak cautions to make sure there are no thorns or other pieces of debris that caused a flat stuck in the tyre. “Miss one tiny thing, and you’ve wasted time, wasted a tube, and you’ve still got a flat,” he warns. You can always get creative. “I once helped a guy stuff his tyre with pine needles and then blasted it with CO2 to get him home,” says Hopper. Another essential to carry: latex gloves – fixing tubeless flats can be messy with the sealant.
To cut down on flats, check your sealant regularly (every few months or more frequently in hot climates), pop the bead and make sure the sealant is still liquid and hasn’t evaporated or dried into “boogers.” Or shake the tyre side-to-side to see if you can hear it sloshing around. If it has dried up, pull the tyre, clean out the debris, and reinstall fresh sealant.
Tubeless tyres require slightly different setup techniques, and have higher maintenance requirements than conventional clinchers. But, says Curiak, for mountain bike and gravel riders especially, the benefits outweigh its finicky nature. “The technology is so freaking fantastic these days,” he says, and echoed Hopper’s assessment: “In use, I don’t see any drawbacks.”
Other Tubeless Terms To Know
Sealant: The liquid that keeps the system from leaking air and seals punctures. There are various formulas, but generally it consists of very small, solid particles of fibre or rubber suspended in some kind of liquid matrix (latex is common). The sealant sloshes around the tyre when the bike is rolling and coats it to prevent general air loss and seals smaller punctures.
Sealant only works for punctures up to a certain size (usually a few millimetres). Larger punctures, like from a sharp rock that slashes a sidewall, will cause a flat and require more extensive repairs. Sealant lasts years in a tightly sealed container, and from one to six months inside a tyre.
Valve Stem: Tubeless valve stems feature rubber grommets and a knurled nut that seal the valve hole on both sides of the rim bed. The cores are often removable, which allows a low-mess way to add sealant without gumming up the core. The rubber grommet profiles are often specific to the rim cross-section; valve stems from one wheel company may not work with other brands.
Tubeless Rim Tape: The plastic adhesive tape that’s used to seal the rim bed from air loss. Not all rim tape is tubeless; look for tape that’s specifically listed as for tubeless systems. If your wheelset has a solid rim bed with no holes for spokes, it doesn’t need tape. Installing tubeless rim tape is a precise job. Prep the rim bed by wiping with alcohol or acetone and a clean rag and let dry. Stretch the tape just tight enough not to deform around spoke holes, and keep it straight and free of wrinkles that could leak air. A double wrap of tape makes for a better, more durable seal, says Hopper. Tubeless tapes are very light; this will add only a few grams of weight.
This article originally appeared on bicycling.com.
READ MORE ON: BIKES AND GEAR gear maintenance tubeless tyres tyres