This is true even, and maybe especially, if you’re riding a bike that’s not going anywhere in your pain cave because you’re in a very fixed position, with no coasting, cranking out more than 5 000 revolutions per hour, says physical therapist and bike fit specialist Kevin Schmidt, owner of Pedal PT in Portland, Oregon, who does home fittings in his area.
“I had a client who did a virtual bike fit, and they said he was good to go but he was still getting hip, IT, and knee pain. So he made an appointment for me to come to his home and investigate, and his cleats were misaligned. It’s hard to diagnose small rotations or general cleat placement over a virtual fit. But it makes all the difference,” Schmidt says.
Fine tuning your cleats can also give you some easy speed, says Steve Hogg, a world renowned expert on cycling fit from Canberra, Australia, who has fit countless WorldTour pros and trained elite bike fitters.
“I have one elite customer who, after major changes in cleat position, improved his personal best over a 43K time trial by 3 minutes,” Hogg says. “Most riders can make a positive difference in their performance with a change in cleat position.” You can, too.
GET FAST – STARTING TODAY with Bicycling’s Next Level Training
First, Find the Ball of Your Foot
The ball of your foot is the reference point for cleat placement. To find the ball of your foot, first locate the joint at the base of your big toe, also known as the first metatarsophalangeal joint, or MTP. Using this as your starting point, imagine a line connecting this first MTP to the base of your pinky toe, or fifth MTP joint.
“That angled line creates the ball of your foot,” Schmidt says. “Some people have a larger, steeper angle. Some people have a smaller, less-steep angle. It’s unique for every foot. You’ll want to bisect that line with the pedal spindle as your starting point.” In other words: Aim to get the first MTP in front of the pedal spindle and the fifth MTP behind it, so this imaginary line is bisecting with the spindle.
Adjust Cleats Fore and Aft for Comfort, Power, and Riding Style
Now determine your fore/aft (a.k.a. front to back of the shoe) position. That positioning uses the ball of your foot as the initial reference point.
Your calves work hard stabilising the foot on the pedal during cycling; cleat position fore and aft affects just how hard. The further forward the cleat, the harder the calves need to work. Having them forward does, however, allow you to apply higher peak torque to your pedals. The key is finding the right position that will provide the torque you need without the calf fatigue you don’t.
“I’ve found over many years and thousands of customers that the great majority of riders perform better with the ball of the foot in front of the pedal axle on a conventional shoe,” says Hogg, who recommends the following placement as a starting point.
- Shoe sizes Euro 36 to 38: centre of ball of foot 7 to 9 mm in front of the centre of the pedal axle
- Shoe sizes Euro 39 to 41: 8 to 10 mm in front
- Shoe sizes Euro 42 to 43: 9 to 11 mm in front
- Shoe sizes Euro 44 to 45: 10 to 12 mm in front
- Shoe sizes Euro 46 to 47: 11 to 14 mm front
- Shoe sizes Euro 48 to 50: 12 to 16 mm in front
Depending on what kind of riding you do, you can try adjusting your cleats accordingly (see below). This advice is also applicable for stationary cyclists (think: your indoor trainer, Peloton or similar bike) depending on what kind of stationary riding you do most.
→Pure sprinter (track, short/HIIT workouts): Move the cleats forward from the recommendations above. Endurance isn’t a major factor in sprinting and so calf fatigue isn’t an issue.
→Road racer (crits, day races): Move cleats so that the pedal axle is a bit behind the ball of the foot (as recommended in the chart) to relieve the calves. This is especially true if you are a road racer who likes to get into the break and launch some attacks before the sprint. Rearward cleats will allow your big muscles to work better while keeping the calves fresher for the long haul.
→TT rider, distance rider, gravel rider, and/or mountain biker: If you need to ride hard and/or long and have little need for sudden acceleration, move them even further back toward the mid-foot. Some riders find this position also helps them eliminate “hot foot,” numbness and tingling, and other painful foot conditions that arise from pressure on the feet.
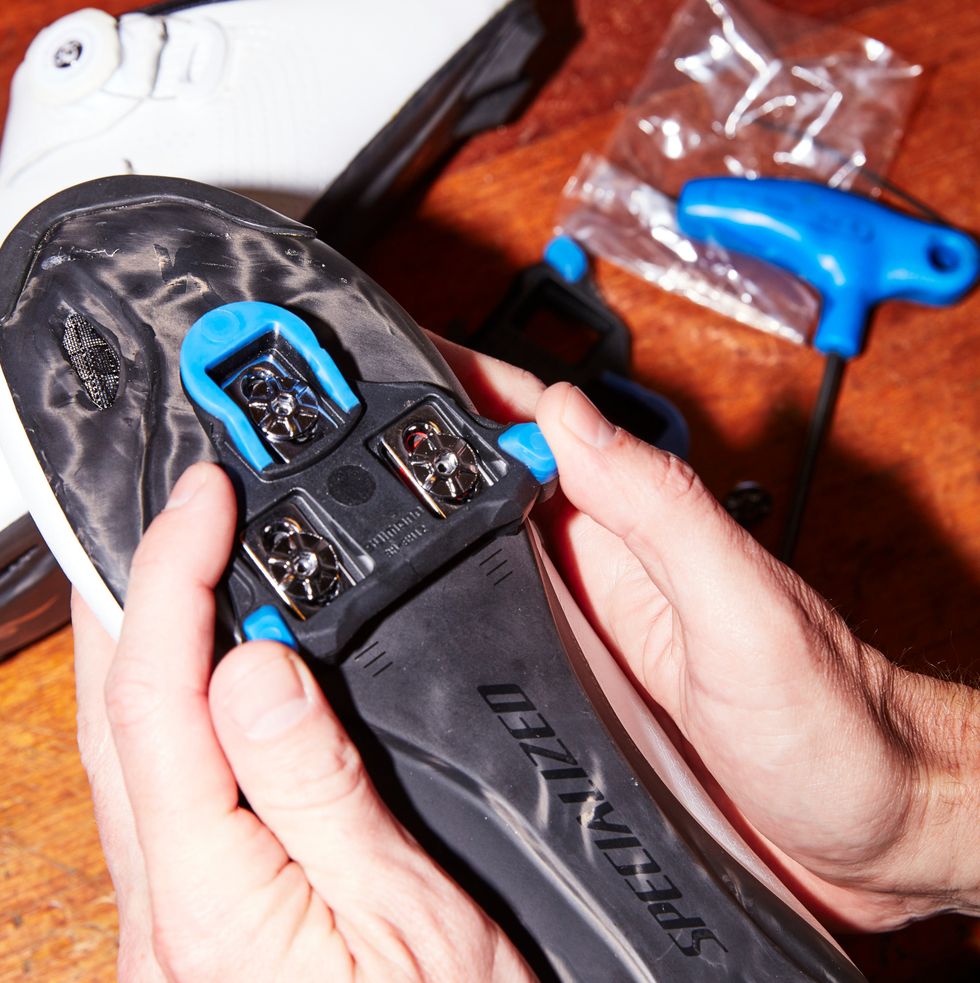
Line Up Your Cleats

Finally, you want to set your cleats at the proper angle. In general, you want them positioned so the toe of the cleat is pointing inward a tiny bit, which allows the heel to rotate inward while pedalling. Shoes often have guidelines on the sole to help you line them up just so.
“Laterally rotated cleats is the number one issue I see when I go into people’s houses to do a fitting for their Peloton,” Schmidt says. “They often look at the curvature of the shoe and try to line it up with the ‘curve’ or the sole of the shoe, but even a small degree of lateral rotation can cause your heels to kick out and your knees to turn in, which can lead to joint stress.”
Most cleats incorporate at least 5 degrees of “float,” meaning they allow for a bit of natural rotation, so this general starting position will work for the majority of riders. If your feet turn markedly inward or outward, however, you’ll need to adjust your cleats to be more in line with your foot’s natural, anatomical position, so your hips and knees work in their normal range of motion.
Importantly, you don’t want your heel or ankle hitting the crank at any point while pedalling. To fine-tune cleat angle, Hogg recommends the following procedure:
While riding at a brisk pace, stop pedalling and coast with the right foot forward. Try to move your heel inward. Is there available movement? If no, stop and adjust the cleat to allow the front of the cleat to face a bit further toward the inner edge of the shoe, and then retest until there is available movement. Once you have available movement from your natural placement under load, repeat the pedal and coast test, but this time, attempt to move the heel outward. Is there available movement? If the answer is no, stop and adjust the angle of the cleat so that the nose of the cleat faces a bit further to the outside of the shoe. Retest until the amount of heel movement in and out of your natural rotational angle is fairly even. Then repeat on the other foot.
Set the Stance
Stance is the distance between your feet when you’re clipped in. It’s determined by the cranks, the number of front chainrings, and bottom bracket width, in addition to where the cleat is set with respect to the inner and outer edges of the shoe.
Every pedal system has a way to allow you to manipulate the stance width at least a few millimetres. When you move the cleats laterally to the outside of the shoe, the foot will be positioned more inward on the pedal, narrowing the width of stance. When you move the cleats medially to the inside (towards the arch) of the shoe, the foot will be positioned outward on the pedal, and widen the width of stance.
Generally speaking, you want to position your stance so your feet feel like they’re underneath your knees and your hips, knees, and feet maintain healthy alignment as you pedal. If you’re feeling pressure on the outside of your foot, or feel like you are pedalling with the outside of your foot, it also may suggest your stance needs to be widened, as your foot is trying to widen the stance.
If you have tight hips and it’s difficult for you to bend your knee past 90 degrees, moving the cleats to widen your stance and open the hips can help (as can raising the saddle), Schmidt says. If you tend to have IT band pain, you might also want to widen your stance, or possibly lower your saddle.
If you’re riding a bike with a triple chainring or a fat bike that puts your feet out in a wide stance, you may need to move your cleats closer to the outer edge of the shoe to bring your feet back into a narrower, more comfortable and natural range.
When to See a Pro
Most people can position their cleats where they need them on their own. But if you have any doubt or are running into any discomfort and/or pain, definitely make an appointment and get a full cleat and bike fit from a pro.
“Because you’re connected to your pedals, where you position your cleats has a significant impact on your bike fit and overall comfort,” Schmidt says.
Anything that is off, even a tiny bit is then further magnified the longer you ride due to repetition, so it’s best to get it right to nip any issues in the bud before you run into bigger problems down the road.