Use These Key Cycling Metrics To Make Your Rides Better
Cycling is a numbers game: we love our metrics, our measurements, our gadgets and our post-ride analyses. Here are the ones that matter.
Confused by all the data modern cycling and its obsession with metrics throws at you? Don’t be – learn what numbers to track, to see your progress and improve your performance.
My favourite of all the metrics has always been feel. I trained for two Ironman events, including World Championships in Kona, and entire mountain bike stage races, tracking nothing but time, distance, speed, and how I felt. I’d trained enough with heart rate and power to know how they worked, but I always reverted to feel.
That said, there have certainly been races where I’ve blown up – where the implosion probably could have been prevented, had I been watching my watts. And the times I did spend training with power, there’s little question my sessions were more precise and probably more productive. It can be easier to stay on track with training when you have measurable goals and quantifiable sessions.
Today, I strike a compromise between luddite and tech-geek, tracking my resting heart rate and heart rate variability with an Oura ring, and recording heart rate for most rides so I can keep an eye on how fatigued and/or fresh I am.
Ultimately, I think that’s the best process when it comes to using data. Start with the basics, then add on as you get more experience. Most riders end up settling on a handful of metrics they rely on most. Obviously, tracking cycling metrics generally means you need a device to capture that data. Most of the metrics – such as the speed, distance, time and elevation mentioned here – can be captured with a GPS-enabled bike computer such as a Garmin, Wahoo, Lezyne, or Hammerhead. The deeper you want to dive into the data, the more sensors you need.
1. Speed/Average Speed
Great for: The satisfaction of seeing your pace pick up
Equipment needed: Any basic bike computer
Your kilometres per hour is a fun metric to track, and it can tell you broadly high much fitter you’re getting. The catch: it’s not very reliable to use in training, because so many factors influence it. For example, you may be cranking out World Pro-level wattage; but if you’re doing so into a 50km/h block headwind, you’re not going to be setting any land speed records.
Your average speed is best used as an indicator of how your training is going over time: if you are now consistently averaging 28km/h on a loop that you used to average 25 on, you can see you’re getting fitter and faster.
You can track your average time with and without your stopping time factored into the pace. Most people don’t factor stoppage (or ‘café time’) in because they want to see moving time only. But if you’re training for a big event like a gravel race, it’s important to know your average speed including that stoppage time, because races often set cut-offs based on a certain pace, which includes rest stops. Once you see how long those ‘short breaks’ really are, you can learn to keep them quick and avoid missing time cuts. You’ll also know how fast you need to ride to allow yourself the stoppage time you plan to take.
2. Distance
Great for: Watching your endurance increase
Equipment needed: Any basic bike computer
We all like to see how far we’ve gone, especially on a big ride. Distance can be a motivational metric to track. If you’re averaging 100-150km a week, can you make it 200? Can you set an annual goal of hitting 5 000km or more?
When tracking distance, it’s important to take into consideration what type of riding you do. Riding 100km on flat roads is very different from 100km of singletrack. One might take three to four hours, while the other takes the better part of a day.
Distance is also important to track if you’re training for a ride of a specific distance. If you want to ride a 100+km funride, you’ll want to work up to it by hitting 50km and 75km rides as the event approaches.
3. Time
Great for: Learning pacing for events
Equipment needed: Any watch will do, but a bike computer can automatically track moving time and stoppage time
Most cyclists train by time because that’s our most finite resource. How much time you have each week to ride determines how to best use that time if your goal is to improve performance.
Riders with a tight time budget are best served doing polarised training that emphasises short, hard interval workouts during the week, and longer rides as time permits on the weekend.
4. Elevation
Great for: Bragging rights and building strength (hills make you stronger!)
Equipment needed: A GPS-enabled bike computer
Elevation gain in cycling is the total number of metres you climb over the course of a ride. Climbing is good training, because your body must work harder in the effort to overcome the pull of gravity. If you’re the kind of rider who routinely avoids inclines, setting climbing goals and tracking elevation can give your cycling fitness a boost.
If your goal is to focus on elevations, start by aiming to hit an average of 150m per 15km. Work up to what some climbing lovers call the ‘golden ratio’ of 300m of vertical gain per 15km of riding. For further motivation, join one of Strava’s monthly climbing challenges.
5. Calories/Kilojoules
Great for: Fine-tuning your fuelling
Equipment needed: Apps such as Strava will estimate your calorie burn; but for more accurate data, use a heart-rate monitor and/or power meter
A calorie is a unit of energy provided by food. The calorie metric provided on your cycling computer or smartwatch is how many of those units you used to complete your ride. But calorie calculations are an imperfect science.
Some devices will provide estimates based on algorithms, which are just that: estimates. Past research has shown that devices can have a wide margin of error: a Stanford University study published in 2017 reported that not one of the seven devices they tested – including the Apple Watch, Fitbit Surge, Mio Alpha 2, Basis Peak, Microsoft Band, PulseOn, and the Samsung Gear S2 – delivered an accurate number for calories burned. The most accurate one, the Apple Watch, was off by 27 per cent. The least accurate one? Off by 93 per cent.
A more recent meta-analysis published in the British Journal of Sports Medicine echoed these findings, indicating that though devices that measure your heart rate along with your movement are more accurate, they all have a pretty significant margin of error. Apps such as GarminConnect, Strava and other training apps might be a bit better, but they’re not perfect either, and the number they give you depends heavily on the information you give the app.
The more detailed data you input about yourself, such as age, height, weight, gender and max heart rate, the more accurately their internal algorithms can calculate your calorie burn. Wearing a chest-based heart rate monitor that is synced to your device also helps make your calorie count more accurate.
Ultimately, the best way to know how many calories you burn on a ride is by using a power meter. Power meters measure the work you’re performing and display it in kilojoules, which is a unit of work that takes into account that the human body isn’t 100 per cent efficient when turning energy from your fuel stores into physical work, like pedalling a bike.
“Kilojoules and calories burned in cycling convert to a 1:1 ratio,” explains USA Cycling elite coach Daniel Matheny, head coach at Matheny Endurance in Colorado Springs. If your ride file says you performed 800 kJ of work, you can feel confident (within a 5 per cent margin of error) that you burned about 800 calories.
Tracking calories is useful for helping you fuel for rides. Some riders underestimate the number of calories they’ll burn on a three-hour group ride and end up falling off the back, on the verge of bonking, three quarters of the way through. Properly fuelled riders ride faster and happier.
Just note that the goal is not to replace every calorie you’re burning as you ride. Your gut can’t take that. “Replace about half the calories you’re burning per hour for rides lasting longer than three or four hours, to keep fuel levels topped off,” says sports physiologist and SkratchLabs founder Allen Lim, PhD.
You may also notice that the fitter you become, the fewer calories you burn on a given ride at a given pace. That’s because your body has become more efficient at using oxygen.
6. Cadence
Great for: Training leg strength and speed; for new riders, watching fitness improve
Equipment needed: A cycling computer and cadence sensor
Cadence is the number of revolutions you spin per minute as you pedal. If you have a cadence sensor, you can watch your cadence in real time on your bike computer and track your average cadence for each ride.
However, it’s debatable how useful it is to track and/or train cadence. Coaches used to recommend athletes aim to pedal at 90rpm, but research doesn’t really show benefits from forcing yourself to do so. In 2019, a team of British researchers found that not only did amateur riders not get any added benefit from high-cadence cycling, they also became less efficient, so they were wasting energy.
Hunter Allen, CEO of Peaks Coaching Group, and author of <itals>Training and Racing with a Power Meter,<end itals> explains that your cadence will be determined by two things: your main muscle fibre type, and your level of cardiovascular cycling fitness. The balance of those factors (which of course can change, over time) determines your ideal cadence.
Newer riders tend to pedal more slowly, because their cardiovascular system can’t handle the higher heart rate that comes with high cadences. As fitness improves, cadence generally rises.
While you probably don’t need to track your cadence from ride to ride, if you have a cadence sensor it can help you do cadence drills, such as low gear/high cadence and high gear/low cadence drills that can help build cardiovascular fitness, leg speed, and leg strength.
7. Rating of Perceived Exertion (RPE)
Great for: Learning what sustainable (and unsustainable) efforts feel like, and tracking fitness improvement
Equipment needed: Your heart, lungs, legs, and brain
It doesn’t get any more basic than RPE, your rate of perceived exertion. Put more simply, it’s a measure of how hard you feel like you’re working. On a 1 to 10 scale, 1 is coasting along on a flat road with a tailwind, and 10 is full gas, willing yourself not to vomit.
You can also think of this as your ‘breath analyser’, because monitoring your breathing is an easy way to rate your efforts. Your muscles use more oxygen the harder you push, so breathing rate is a direct indication of work. If you’re able to sing or recite poetry, you’re not working very hard. If you’re gasping uncontrollably, you’re maxed out.
Research shows RPE works just as well as any scientific equipment for measuring your actual effort at any given time, but it doesn’t tell you much more. For instance, you may be huffing and puffing and battling burning legs, but barely producing any power; or you could be feeling chainless while cranking out major wattage. Though you can train by ‘feel’ alone, you get a more complete picture of your daily sessions and progress if you pair it with other metrics such as heart rate or power.
It also takes discipline to train by feel because you have to remain tuned in, and it’s all too easy to slack off when you should be pushing, or push too hard on a recovery day.
8. Heart Rate
Great for: Creating specific training zones, and tuning into your freshness and/or fatigue
Equipment needed: A heart rate monitor and compatible bike computer or watch
As your effort increases, your heart pumps more oxygen and nutrient-rich blood to fuel your muscles. The result: your heart rate goes up. Monitoring your heart beats per minute (BPM) with a heart-rate monitor will tell you just how hard you’re working.
To use heart rate, you need to first determine your max heart rate (MHR), i.e. the highest number of BPM you can hit. Forget the generic 220-minus-your-age formula for determining max heart rate, and take a field test instead:
Warm up thoroughly, then do a 10-minute time trial as hard as possible, kicking it into full throttle for the final 60 seconds, aiming to full-on sprint the final 20 seconds. Cool down and check your data for MHR. Repeat two more times (with rest days in between) to find your true max. Once you have your max, you can break down various levels of training efforts according to percentages of that number. As you get fitter, you’ll be able to ride faster at lower heart rates.
Overall, heart-rate monitoring is an excellent training tool – but there are a few downsides. For one, it’s a little fickle. Your BPM can drift up or down depending on how much coffee you’ve had (caffeine raises it); ambient temperature; your hydration status; your plasma volume; how rested you are; and where you are in your menstrual cycle. It can also drift up within the same ride, especially when it’s hot.
Pairing HR and RPE tracking gives you a more complete picture of your effort. If you’re performing tempo intervals at a target heart rate of 150 BPM and your RPE is around 5, you’re on the money. If you’re performing those same intervals but working at an RPE of 8 to hit that same heart rate, that’s a sign that you’re not recovered, and should do an easier workout. There’s also some lag time between the moment you increase intensity and the moment your heart rate reflects it, so it’s not the best tool for high-intensity efforts.
You can monitor your heart rate with a chest strap or wrist-based heart rate monitor via your sports watch. Wrist-based sensors on smartwatches and fitness trackers can be less accurate for cyclists, according to some research. That may be due to the optical sensors having less consistent contact with our wrist as we bend it to grasp our bars.
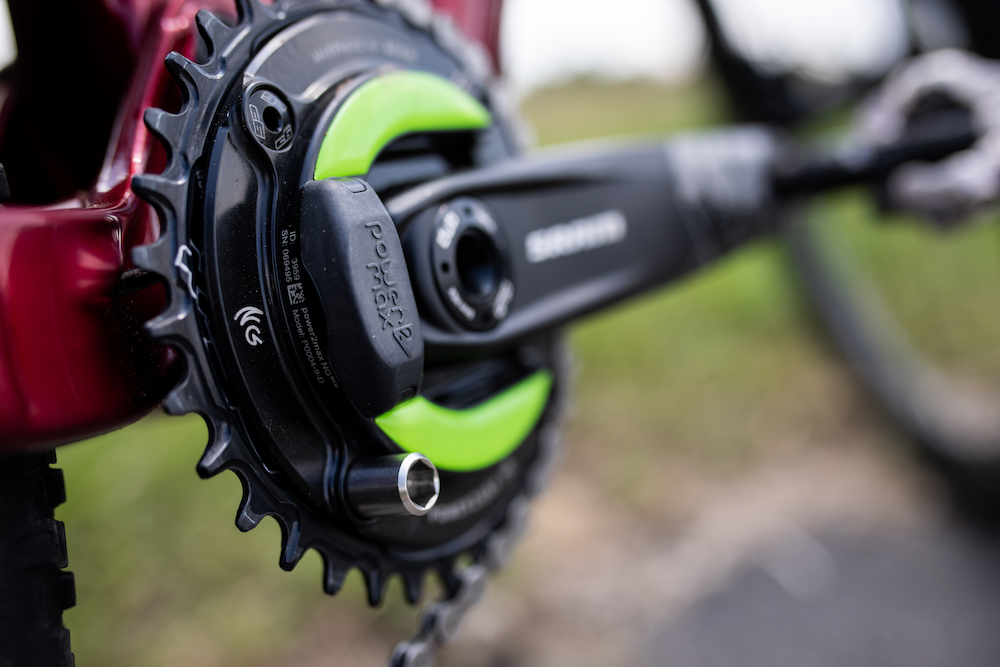
9. Power (Watts)
Great for: The most accurate measure of your effort
Equipment needed: A power meter and a compatible bike computer
Power equals work over time. In cycling, your work rate is described as watts of energy produced: being able to produce a lot of power for your size makes you faster on the bike. Monitoring your watts with a power meter gives you instant feedback about how hard you’re working.
Power training generally revolves around your functional threshold power, or the wattage you can produce for a one-hour time trial, which is a fundamental benchmark for fitness. A common protocol for determining your FTP is performing a 20-minute time trial and multiplying that average wattage by 0.95, since your hour-long wattage would be about 5 per cent lower, according to Allen.
The beauty of power is that it is absolute: You are either producing 350 watts on those hill repeats, or you’re not. If you’re not hitting your intended watts for a given workout, it’s time to rest.
Though power is more precise than heart rate, it’s worthwhile to combine the two, as heart rate represents your body’s response to the work you’re doing. Your heart rate should rise and fall in line with your power output. When your power is low and your heart rate is high, it’s recovery time. If you’re serious about training to the point that you’ve hired a coach, a power meter is a good investment.
10. Heart-Rate Variability (HRV)
Great for: Understanding when you need more recovery time
Equipment needed: An Oura ring or a Whoop strap, which you would need to import (together with paying a subscription), or a newer-generation smartwatch/GPS such as the Polar Grit X
HRV is a relatively new player in the performance tracking sphere. Unlike heart rate, which you watch in real time, HRV is one that you track once a day, preferably first thing in the morning (or if you wear an Oura ring or Whoop strap, you’ll see your average overnight score).
HRV is a good indicator of your recovery and/or readiness. It may seem counterintuitive, but a fit, rested, healthy heart should not beat consistently like a metronome. Instead, it should nimbly respond to input from your sympathetic (fight or flight) and parasympathetic (rest and digest) nervous system.
High variability (reflected in a higher HRV score) shows that you’re ready to go, and capable of adapting to your environment and responding to exercise demands to perform well. Low variability between beats can be a sign of stress, fatigue, and inflammation – all things that can follow training too hard with too little recovery.
HRV is specific to each person, and naturally declines with age. Though high numbers are considered ‘better’, ‘high’ is relative to your own baseline. One person’s high HRV might be 125, while another’s high might be 55.
Referenced regularly, HRV scores will help you track fitness gains. For example, you’ll typically see HRV measurements decrease (become more negative) during long, heavy training blocks. Then you should see a rebound, where your HRV is significantly higher, after a recovery period. An upward trend over time means you’re getting fitter. A downward trend means you’re training too hard and/or under too much stress, without proper rest and recovery. When using HRV, it’s important not to put too much weight on a single day’s reading, but rather to look at trends and averages over a few days.
You can buy individual HRV monitors like straps and finger clip sensors, but if you’re going to track HRV, you should also track resting heart rate, sleep, and training load and/or activity levels, so you can put it into context. So a device like the Grit X is the way to go, because they automatically put HRV into the context of the whole picture. (If you work with a coach, they can as well).
Do you need to track HRV to become a better rider? Of course not. You can generally tell when you need a rest day by feel. But if you routinely train hard and like to dial in your training and lifestyle habits for optimum recovery and training readiness, this is a useful metric to use. It can be especially helpful if you’re trying to establish healthy habits such as cutting back on alcohol and getting more sleep, because those types of lifestyle factors show up quickly in HRV scores.
Putting Your Cycling Metrics Into Practice
All this measuring and monitoring doesn’t do much good unless you apply it to specific training purposes – that is, training at different effort levels to build specific types of fitness. That’s where training zones come in. Different coaches break down training zones differently, but in general you’ll see effort levels spread out over five to seven zones that range from recovery to max effort. For example, here are five classic training zones:
Zone 1/Easy
You need to ride easy so your body can heal, adapt, and get stronger and fitter. Zone 1 rides should feel ridiculously easy. Your only goal is to boost your circulation and promote repair and recovery. These rides hover at one or two on the RPE scale.
Zone 2/Endurance
Zone 2 is all about aerobic effort. Endurance rides require enough energy to feel like exercise, but still let you carry a conversation, cruise for hours, and enjoy the ride. These efforts stimulate mitochondrial growth, and build capillaries and fat-burning capacity. Zone 2 rides are done at an RPE of three to four.
Zone 3/Tempo
Efforts in Zone 3 are just above your comfort level, so you’re breathing faster and working harder than you would on a typical aerobic, endurance ride. You’re not working so hard, however, that you can’t sustain your effort for a long period of time. Steady Zone 3 tempo efforts improve your body’s ability to clear and use lactic acid, so they also help raise your lactate threshold. They’re done at an RPE of five to six.
Zone 4/Threshold
If VO2 max is your roof, lactate threshold the point at which you start working anaerobically—is your drop ceiling. Training in Zone 4, which is right at that point, helps you hit higher intensities before you bump into that overhang. These efforts are done at an RPE of seven to eight.
Zone 5/Max
To raise your VO2max, the maximum amount of oxygen your body can use, you need to push yourself as far into the red as you can go. Zone 5 efforts are done full throttle – a nine to 10 on the RPE scale. Because they’re so hard, they’re also very short, generally lasting three to five minutes.
READ MORE ON: heart rate measurement metrics power progress tracking tracking progress